Showing posts with label tutorial. Show all posts

12/30/13

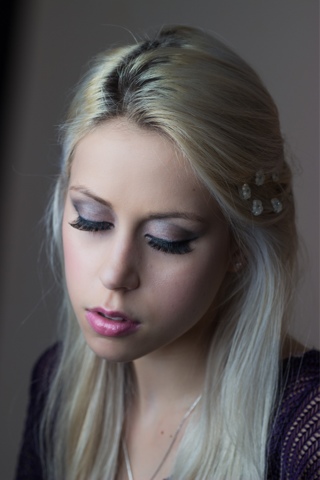
New Years Eve/Holiday Make-up

Hello lovelies,

Here is a glamours and colourful make-up look perfect for any New Years Eve plans that you may have. Purple is one of my favourite colours and I think it looks especially pretty on the eyes whether you have green, blue or brown eyes.

Step 1:
Using a flat eyeshadow brush or your fingers press Maybelline color tattoo in too cool on the inner corner of your eye.

Step 2:
On the remaing of your lid and up to your crease use Maybelline color tattoo in painted purple.

Step 3:
Use a semi-shimmery purple eye shadow (mine is from an essence palette 03 vamp it up) and pat this on top of painted purple.

Step 4:
In your inner corner use a shimmery pink on top of too cool. I used the lighter pink from my Stila written in the stars palette.

Step 5:
Very lightly use a darker purple to deepen your crease. I used busted from my Urban Decay Naked2 palette. Be sure to blend, so the colour doesn't look too dark or harsh.

Step 6:
Using the two pink colours side by side in my stila palette I softened up my crease by blending them into and above my crease over busted. This creates an easy and soft transition of colour.

Step 7:
Line your upper lash line and wing it out at the end for a more dramatic look.

Step 8:
Line your bottom lash line with either a pencil or a shadow.
Using a flat brush I lined my lowet lash line with busted from my Naked2 palette.

Step 9:
Apply your favourite lengthing mascara to your top and bottom lashes.

Step 10:
Highlight under your brown bone (once your brows are completed). I used bootycall from Naked2

Step 11:
Put on your favourite light pink lipstick and gloss.
I used Mac lipstick in snob and Mac lip glass in wee coquette.

For the face I contoured my cheeks bones, applied a soft pink blush and a shimmery pink highlight above my cheekbones, along the bridge of my nose and on my cupids bow for the perfect pout.

You are all finished!!!!
Thanks everyone for reading and I hope you like this look. Let me know if you wear this on New Years or if you do something similar.

Also what is everyone us doing tomorrow night to ring in the New Year?!?!?
Comment below!!!

xoxo
annpaige

12/14/12

Bye bye FRIZZ!!!

Hello lovelies,

I have thin hair, but not very frizzy hair, mind you that can all change after blow drying. I always dry to let my hair dry, especially since I bleach it, I don't want to put my hair through any more damage. Having said that there are always times that don't allow me to air dry and I have to blow dry my hair. Here are some of my favourite hair products that I use after every shower and before every blow dry.

As soon as I get out of the shower I let my hair stay up in a towel for as long as possible, while I do my makeup or pick out my outfit. The first step after taking my hair out of the towel when my hair is still damp is to apply a generous amount of göt2b's crazysleek flat iron & blow dry lotion. I love this product because it has keratin in it and it also doesn't leave my hair feeling heavy. It also has a heat protectant so it is perfect for smoothing and protecting my hair.

The next product I use is the Garnier Fructis color shield double care leave-in conditioner. This leave-in conditioner is my fav ever!!! It is supposed to be a detangler and my gosh is it ever. It has acai and grape seed oil which helps to smooth out my hair for brushing. It also has UV filters in it which is great for platinum blonde hair (helps keep those yellow tones away, that the sun can give) and really any dyed hair because it won't get damaged by the UV rays!!! I also love this product for everyday use when my hair is looking a little dry.

The next product I love to use is the göt2b oil-licious triple oil with argan, white grape and marula oil. This is an amazing product for my ends, to help keep them healthy. When using this product you only need about a dime sized amount and that covers all my hair. Just pour a little in your hands and heat it up with the warmth of your hands and apply where needed. I do avoid the roots and I apply from the top of my ears down. This is another product I also use on a daily basis with dry hair if my ends are looking a little dry.


Here is a before and after of my frizz ball hair to my nice and smooth hair.


I hope this little hair "tutorial" helped some of you and that you found some new products that you as we'll can try. Please leave any and all comments below!!!

*göt2b products were sent to me from vervegirl and göt2b. All thoughts and opinions are my own, I was not paid to do this review, I really do love all of these products!!*

check out more from vervegirl at www.vervegirl.com


xoxo
annpaige

12/11/12

Christmas Nails

Hello lovelies,


(First off I just want to say I now I am super late with my next Holiday makeup look, but I have not been able to take the pictures of my looks. At the moment I have only had my IPod and the picture quality is not good at all. I will have the next look up this week end for sure!!!)

I cannot believe how fast this year has gone by, it is so crazy!!! Being December the 10th already that means there are only 15 days left until Christmas!!!! Speaking of Christmas and all, I have been getting super excited lately and I have this really cute nail tutorial to share with you all.


I recently got some new products to try from avon's pro nail wear and nail art enamel line and so far I am loving them (except some of my nail art brushes are not thin enough to do a lot of designs :( )With all these new nail polishes, why not do a new Christmas nail tutorial?! You don't have to do the designs in the same order that I did, have fun and do whatever you like with this tutorial.


What you will need:

Base coat, red polish, silver polish, white nail art polish, clear top coat, toothpick /wooden cuticle pusher


Step1: I applied avon's gel strength base coat (my new fav base coat)

Step2: paint all nails (except for your ring finger) with 2 coats of avon's real red

Step3: paint ring finger with two coats of your fav silver nail polish

Step4: to create the snowflake on our thumb start with putting a white dot in the top left corner.

Step5: using a toothpick draw 3 white lines stemming from the dot.

Step6: using the same toothpick draw 2 lines on the side of each of your snowflake lines like a leaf stem.

Step7: to create the snowflake design draw 4 white diagonal lines using your white nail art polish (or a toothpick)

Step8: to create the snowy french tip nail - using your white nail art polish make a white french tip over you red polish.

Step9: draw white dots all over your nail using your white nail art polish (or a toothpick) in no particular order.

Step10: create the same design on your pinky nail as on your thumb.

Step11: put on your top coat (avons uv gloss top coat)and let nail dry.

Step12: do the same thing on your other hand.

Step13: you are done!!!


I hope you all enjoyed this post, please let me know if you try this design at home, I would love to see your renditions.


*this post is sponsored by vervegirl. For more beauty tutorials and awesome Christmas contests check out www.vervegirl.com*


xoxo

annpaige

11/24/12

Blue Christmas - stila holiday series look #2

Hello lovelies,

I am in love with this look. The slight smokeyness and blue on the eyes, makes this the perfect look for any holiday night out. Where this look to work dinner party or even a New Years party. Jazz up the lips with a darker colour for more of a sultry romantic look.


Here are the steps in creating look #2 of my Stila holiday makeup series...

Step1: prime eyes with hard candy sheer envy primer
Step2: using the stila snow angel palette brush #19 eggnog all over lid up to brow bone
Step3: lightly pat #22 merry on the inner corner of your eyelid
Step4: pat on #20 icicle on the rest of your eyelid up to the crease
Step5: using a crease brush blend #28 coal into your crease and also create that "v" shape in your outter corner blend out for a smokey eye
Step6: brush #23 kitten over crease line to blend and also up to brow bone as a highlight
Step7: using a pencil brush take #28 coal and #20 icicle to line your lower lash line to the centre
Step8: Take your stila Stargazer smudge stick waterproof eye liner and line your upper lash line and lower lash line (on top of step #7). Create a slight wing at the end
Step9: using a shimmery white eyeliner line the rest of your lower lash line and water line (mine is from NYC)
Step10: curl your lashes and apply stila's stay all day waterproof mascara for look that will last all night
Step 11: apply your favourite Ardell lashes (I used 120 demi) and bat those purtty eyes!!!

For contour use #12 Shimmery plum
For the perfect pink cheek blend #8 Shimmery peach blush and #3 Shimmery coral blush

For lips I used Mac snob lipstick and stila lip glaze in jolly on top.

You are now ready to rock around the Christmas tree and/or party into the new year with this look!!!


I hope you all enjoyed this look, please leave any and all comments below, I would love to read your feedback and/or thoughts.


Have an awesome night (or morning, depending on when you read this)!!!!!

*(photos by ©Frank Arzaga Photography, for bookings and/or inquiries please contact me by email listed in the sidebar and to view more pictures click here: http://500px.com/frank_arzaga)

xoxo
annpaige

10/9/12

Fall makeup ft. Naked2 by Urban Decay

Hello lovelies,


Today's post is going to be an easy neutral makeup look, perfect for Fall and perfect for all skin tones and can easily be manipulated or jazzed up for a holiday look.

Face:
Foundation:
Garnier BB cream with spf15 in light/medium
Concealer: tarte maracuja creasless concealer in fair(for a brighter look) for under my eyes and around my nose to cover redness
L'Oreal True Match Naturale mineral makeup foundation in 464 Natural Beige
NYC Smooth Skin loose face powder in 741A Transulcent - setting powder

Eyes:
Urban decay's Naked2 palette
Step1: brush foxy all over lid
Step2: tap verve into the inner corner
Step3: brush tease over the rest of the lid and blend into verve
Step4: blend busted into crease
Step5: tap snakebite onto the centre of your eyelid
Step6: using a flat brush use busted on the outer half of lower eyelid
Step7: brush verve onto inner corner of lower line
Step8: line outter half of waterline with black rimmel kohl eyeliner
Step9: line inner half of waterline with white NYC liner
Step10: highlight brow bone with bootycall
Essence felt tip liquid liner in black
Almay 3in1 mascara but with my Maybeline one by one brush (I like the Almay formula but prefer my Maybeline brush and I've also run out of my one by one)

Brows: I just brush on a matte taupe colour from my sephora palette with a flat shadder brush and then a shimmery tan on the inner half and blend with a sephora brow brush

Cheeks:
Rimmel Sunshimmer 3in1 shimmering bronzer
Covergirl insta cheekbones in 220 purely plum contouring blush
Start with the middle colour just on top of bronzer contouring, use the lighter shade on the apples of the cheekbone for a soft look and the darker colour for a bolder Fall look. (I used all three.)

Lips:
Brown sephora lip liner
Mac frosted viva glam
Clinique full potential lips duo in colour 16 double plum on the centre of my lips

Highlight above cheek bones bootycall from Naked2


I hope you all enjoyed this makeup look, please leave comments and thoughts below.
If you like seeing makeup posts like this leave me some tutorial requests below and I will try to do more makeup posts for you all!!!


xoxo
annpaige

8/7/12

Ombré nails: white and green

Hello lovelies,

So my nail polish started chipping away and needed a big pick me up. Since I have some time off from work (and my nails won't get ruined) this week I thought why not try something new. I really was just going to paint them white and then I saw some ombré nail designs on YouTube. I looked through my nail colours and thought what I have not used in a while GREEN. Here is what I came out with a well as the products I used.

What you need:

Clear/base coat
2 colours in the same family one dark one light
Sponge
Cotton swabs and
nail polish remover

Step1: apply clear/base coat to protect an prime your nails- I used Sally Hansen Xtreme wear in 100 invisible

Step2: apply white nail polish - I used NYC 134 French white tip (had to apply like 3 coats because it is so thin)

Step3: paint the bright green onto a small sponge and dab onto nails 1/2 way down

Step4: paint darker shimmery green onto sponge and dab onto the tip of your nail covering any spots left from the brighter green

Step4: before everything dries apply your clear coat to blend and smooth out your ombré design

Step5: remove any excess nail polish on the skin and cuticles with cotton swabs


You are done!!!

I hope you all enjoyed this post, I love my ombré nails!!! Also let me know in the comments if you want to see more posts like this and PLEASE answer my new BLOG POLL on the top right of the page. I really want to start blogging more often again and I have so many ideas but really need your helping putting them all together. Thx!!!


follow me
Twitter @annpaige
Instagram @annpaige_

xoxo
annpaige

Featured Post

My platinum journey - brunette to platinum blonde (before and after)

Hello lovelies, Looking back at all of my posts, my bleached locks to ash blonde hair (which I have now deleted due to the quailty) post,...